Thursday, July 29, 2010
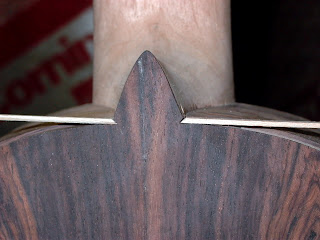
Completed classical guitar body
The body is completed. A purfling may be installed around the edge of the top, but now it's time to finish shaping the fretboard and install frets.
Wednesday, July 28, 2010
Tuesday, July 27, 2010
Gluing binding on a classical guitar
Binding is glued on with white glue and the tail seam is hidden with a piece of rosewood and some white purfling.
Monday, July 26, 2010
Cut binding channels for classical guitar
Binding channels are cut on the top and bottom. This picture shows how the binding is to be let into the heel.
Sunday, July 25, 2010
Acoustic guitar binding
Friday, July 23, 2010
Carving a classical guitar neck.
The guitar neck is rough carved. It's still top heavy so more needs to be taken off the end of the neck by the tuning head.
Monday, July 19, 2010
Bending equipment for acoustic guitar sides

Sides for acoustic guitars and the curved binding are bent over a form. A heating blanket is used for heat and is controlled by a speed control and an electric darkroom timer.
The speed control is pinned to prevent it from being able to switch to full current, making it work ONLY with the dial resistor.
The timer is a safety feature to prevent the blanket from remaining on too long.
If the temperature gets too hot for too long, the wood gets scorched or charred. In the worst case scenario, a fire could break out.
Monday, July 12, 2010
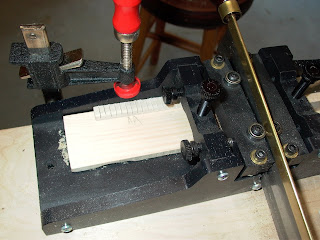
Making kerfed linings
This is a fret slotting jig repurposed for cutting kerfed lining strips for an acoustic guitar body.
Saturday, July 10, 2010
Tentallones

Tentallones are the individual pieces used to attach the classical top to the sides.
The order of operation is to attach the top to the neck, making sure that the centerline of the top and neck are lined up. Then the sides are inserted into the slots in the heel and clamped down onto a workboard. The lining that binds the top to the sides are attached one piece at a time.
The picture shows these pieces being cut. A piece of basswood stock 1/4" x 1/2" is beveled on one side then cut into 1/4" pieces. A sample tentallone is shown on the left side.
Small classical guitar bracing
Friday, July 9, 2010
Preparing the top braces for the small flamenco guitar
A round patch is put over the soundhole area, cross-grain to the top and the other braces are cut to rough dimensions.
The specifications on the plans are pretty heavy, so the brace dimensions are smaller. Also, a bridge patch is an additional divergence from the plan.
It's raining. Time to do something else.
Maybe Sunday to glue and shape the braces.
The specifications on the plans are pretty heavy, so the brace dimensions are smaller. Also, a bridge patch is an additional divergence from the plan.
It's raining. Time to do something else.
Maybe Sunday to glue and shape the braces.
Thursday, July 8, 2010
The classical guitar rosette
Wednesday, July 7, 2010
Tuesday, July 6, 2010
Inlaying the rosette - route the channel
The top with the rosette channel routed. The mosaic pieces are 8.5mm and the channel itself is around 11mm, so some ebony strips will be used to fill the gaps at the outside and inside.
This top is a very stiff piece of spruce from Terrace, BC, sustainably harvested by Mario DaCosta (sprucetonewood.com).
This top is a very stiff piece of spruce from Terrace, BC, sustainably harvested by Mario DaCosta (sprucetonewood.com).
Monday, July 5, 2010
Sunday, July 4, 2010
Redo - mosaic log
Making a mosaic rosette for a guitar
On the left are planks that have been glued. In the center is the press that holds the plank as the glue sets up. On the right are sticks arranged in order waiting to be glued.
At the top is the notebook with the rosette pattern.
The one on the bottom is the design with a black instead of white background, the spiral in faded orange, and the bead in red.
After all the planks are glued, they are scraped flat and glued in a stack to make the rosette log, which is sliced into 1mm tiles. The tiles are assembled in a round form and then inserted onto the guitar top into a channel around the soundhole.
This design is a double spiral with a red bead at the intersections of the curves.
Saturday, July 3, 2010
Rosette, sides, back and top rough in.


Eight 10mm x 1mm planks when glued together make a mosaic log that is sliced into 1mm pieces that are glued into a circular slot around a soundhole. This design isn't going to work, so it will be discarded.
Bent sides are left bound onto the mold for awhile.
The top and back are joined and cut to profile plus a half inch.
Thursday, July 1, 2010
Guitar forms and jigs
Subscribe to:
Comments (Atom)


